How-To: Contribute to the Radius documentation
❗️ Preview Release: This documentation covers a preview of Radius which uses different Resource Types from the current release. Enable it by passing the --preview to the Radius CLI or settingRADIUS_PREVIEW=true.
Radius uses the Diátaxis framework for its documentation:
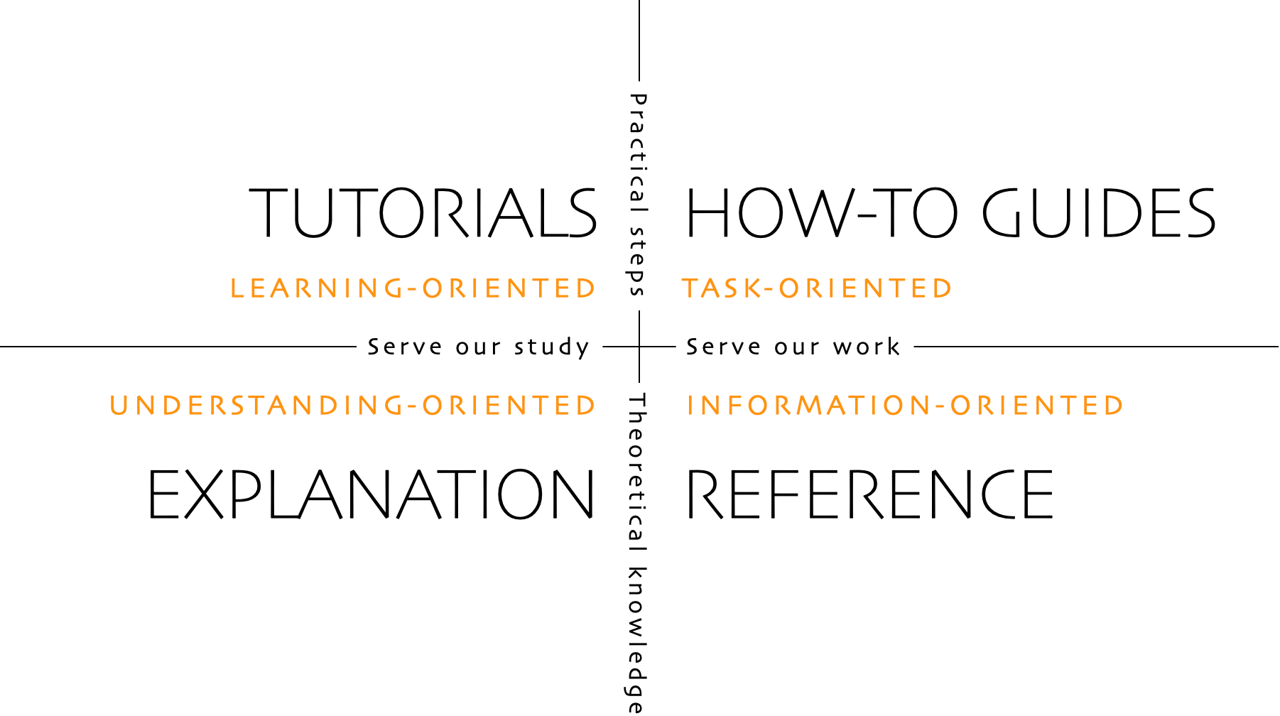
Follow the guidance on this page to learn how to get started, how to contribute, and how to use the Diátaxis framework to create new docs.
Setup your docs environment
The easiest way to get up and running is with a GitHub Codespace. This gives you a fully configured environment with all the tools you need to build the docs, all in your browser.
Note the
postCreateCommandmay take up to 3 minutes to complete after the codespace is created.
- Start Codespace
- Wait for
postCreateCommandto complete - Run
cd docsto enter the hugo site directory - Run
hugo serverto start the local server - Click on the link in the terminal to open the docs in your browser
Pre-requisites
Environment setup
Ensure pre-requisites are installed
Clone this repository and the radius repository
git clone https://github.com/radius-project/radius.git
git clone https://github.com/radius-project/docs.git
Generate CLI docs:
pushd radius
go run ./cmd/docgen/main.go ../docs/docs/content/reference/cli
popd
Change into the docs site directory:
cd docs/docsInstall npm packages:
npm ciThe Docsy theme is pulled in automatically as a Hugo Module, so there is no separate theme initialization step.
Run local server
Make sure you’re still in the
docs/docsdirectoryRun
npm startNavigate to
http://localhost:1313/
Developer Certificate of Origin
The Radius project follows the Developer Certificate of Origin. This is a lightweight way for contributors to certify that they wrote or otherwise have the right to submit the code they are contributing to the project.
Contributors sign-off that they adhere to these requirements by adding a Signed-off-by line to commit messages.
This is my commit message

Signed-off-by: Random J Developer <random@developer.example.org>
Git even has a -s command line option to append this automatically to your commit message:
git commit -s -m 'This is my commit message'
Visual Studio Code has a setting, git.alwaysSignOff to automatically add a Signed-off-by line to commit messages. Search for “sign-off” in VS Code settings to find it and enable it.
Types of docs
Radius follows the Diátaxis framework. Pick the type that matches your goal — the docs are organized by type, so place your page in the matching section:
- Concept — explain what something is and why it matters, so the reader understands the problem it solves.
- Tutorial — teach a newcomer by guiding them through a complete, hands-on lesson from start to finish.
- How-To — walk a reader who already knows the basics through completing a specific task, step by step.
- Reference — describe the details of a feature precisely; auto-generate from source code where possible.
- Schema — document the schema of a resource type or API, typically generated from the source definition.
Whatever you write:
- Reuse an existing section instead of creating a new one where possible — there’s a good chance the right place already exists.
- Write for a new-developer audience: keep steps explicit, copy-pasteable, and environment-agnostic unless the doc is specific to one environment.
- Link to related concepts, overviews, how-to guides, and references.
Writing styles and tips
Style and tone
These conventions should be followed throughout all Radius documentation to ensure a consistent experience across all docs.
| Style/Tone | Guidance |
|---|---|
| Casing | Use upper case only:
|
| Headers and titles | Headers and titles must be descriptive and clear, use sentence casing i.e. use the above casing guidance for headers and titles too |
| Use simple sentences | Easy-to-read sentences mean the reader can quickly use the guidance you share. |
| Avoid the first person | Use second person “you”, “your” instead of “I”, “we”, “our”. |
| Assume a new developer audience | Some obvious steps can seem hard. E.g. Now set an environment variable Radius to a value X. It is better to give the reader the explicit command to do this, rather than having them figure this out. |
| Use present tense | Avoid sentences like “this command will install redis”, which implies the action is in the future. Instead, use “This command installs redis” which is in the present tense. |
Spelling
The docs pipeline uses cspell to check for spelling mistakes. The configuration lives in .github/configs/.cspell.yml and is synced from the radius-project/.github repository so spell-checking behaves the same across Radius repos. If you need to add a new custom word to the allow-list, append it to .cspellignore at the repository root (keep the list sorted, one word per line).
To run the spell checker locally:
npm install -g cspell
cspell lint --config ./.github/configs/.cspell.yml --no-progress --dot "**/*.md"
Numbering
All numbered lists use 1. as the number, regardless of the order. The list numbers are then incremented automatically during the build process of the docs.
Example
1. This is the first step of a process.
1. This is the second step, and will be displayed with a 2 in the docs.
1. This is the third step, and will be displayed with a 3.
Tips and tricks
Any contribution must ensure not to break the website build. The way Hugo builds the website requires following the below guidance.
Front-matter
Front-matter is what takes regular markdown files and upgrades them into Hugo-compatible docs for rendering into the nav bars and ToCs.
Every page needs a section at the top of the document like this:
---
type: docs
title: "TITLE FOR THE PAGE"
linkTitle: "SHORT TITLE FOR THE NAV BAR"
weight: (number)
description: "1+ SENTENCES DESCRIBING THE ARTICLE"
tags: "METADATA ON THE DOCUMENT"
---
Example
---
type: docs
title: "Recipes overview"
linkTitle: "Overview"
weight: 10
description: "A quick overview of Radius Recipes and how to use them to deploy infrastructure for your application"
tags: "Recipes"
---
Weight determines the order of the pages in the left sidebar, with 0 being the top-most.
- Index file weights follow the parent directory’s ordering.
- For the first page in a new directory, reset the counter and set the weight to be an order of magnitude greater.
Front-matter should be completed with all fields including type, title, linkTitle, weight, description, and tags.
titleshould be 1 sentence, with no period at the endlinkTitleshould be 1-3 words, with the exception of How-to at the front.descriptionshould be 1-2 sentences on what the reader will learn, accomplish, or do in this doc.tagsshould be a comma-separated list of metadata tags.
As per the styling conventions, titles should only capitalize the first word and proper nouns, with the exception of “How-To:” - “Getting started with Radius Recipes” - “How-To: Setup a local Redis instance”
Referencing other pages
Hugo ref and relref shortcodes are used to reference other pages and sections. It also allows the build to break if a page is incorrectly renamed or removed.
This shortcode, written inline with the rest of the markdown page, will link to the _index.md of the section/folder name:
{{< ref "folder" >}}
This shortcode will link to a specific page:
{{< ref "page.md" >}}
Note that all pages and folders need to have globally unique names in order for the ref shortcode to work properly. If there are duplicate names the build will break and an error will be thrown.
Referencing sections in other pages
To reference a specific section on another page, add #section-short-name to the end of your reference.
As a general rule, the section’s short name is the text of the section title, all lowercase, with spaces changed to “-”. You can check the section’s short name by visiting the website page, clicking the link icon (🔗) next to the section, and see how the URL renders in the nav bar. The content after the “#” is your section shortname.
As an example, for this specific section, the complete reference to the page and section would be:
{{< ref "contributing-docs.md#referencing-sections-in-other-pages" >}}
Code snippets
Use the rad shortcode to reference code snippets from a file. By convention place code snippets in a snippets folder.
{{< rad file="snippets/mysample.bicep" embed=true >}}
All Bicep sample code should be self-contained in separate files, not in markdown. We validate all .bicep files as part of the build for syntactic and semantic correctness, and so all .bicep sample code must be complete and correct. Use the techniques described here to highlight the parts of the sample code users should focus on.
Use the embed parameter (default false) to include a download link and embed the content in the page.
Use the lang (default bicep) parameter to configure the language used for syntax highlighting.
Use the marker parameter to limit the embedded snipped to a portion of the sample file. This is useful when you want to show just a portion of a larger file. The typical way to do this is surround the interesting code with comments, and then pass the comment text into marker.
The shortcode below and code sample:
{{< rad file="snippets/mysample.bicep" embed=true marker="//SAMPLE" >}}
// in snippets/mysample.bicep
resource app 'radius.dev/Application@v1alpha3' = {
  name: 'storefront-app'

  //SAMPLE
  resource store 'Container' = {
    name: 'storefront'
    properties: {
      container: {
        image: 'foo'
      }
    }
  }
  //SAMPLE
}
Will result in the following output:
  resource store 'Container' = {
    name: 'storefront'
    properties: {
      container: {
        image: 'foo'
      }
    }
  }
Use the replace-key-[token] and replace-value-[token] parameters to limit the embedded snipped to a portion of the sample file. This is useful when you want abbreviate a portion of the code sample. Multiple replacements are supported with multiple values of token.
The shortcode below and code sample:
{{< rad file="snippets/mysample.bicep" embed=true marker="//SAMPLE" replace-key-container="//RUN" replace-value-container="container: {...}" replace-key-connections="//CONNECTIONS" replace-value-connections="connections: {...}" >}}
// in snippets/mysample.bicep
resource app 'radius.dev/Application@v1alpha3' = {
  name: 'storefront-app'

  //SAMPLE
  resource store 'Container' = {
    name: 'storefront'
    properties: {
      //RUN
      container: {
        image: 'foo'
      }
      //RUN
      //BINDINGS
      connections: {
        backend: {
          source: other.id
        }
      }
      //BINDINGS
    }
  }
  //SAMPLE
}
Will result in the following output:
  resource store 'Container' = {
    name: 'storefront'
    properties: {
      container: {...}
      connections: {...}
    }
  }
Embedding a sample from the samples repository
Some pages embed application samples straight from the radius-project/samples repository instead of keeping a separate snippets copy. Those files are vendored into docs/static/samples/ and kept in sync automatically (see Keep the sample application in sync). Reuse this pattern so the embedded code, the source link, and the deploy command all stay version-correct and never drift from the tested sample.
Embed the vendored file with the rad shortcode using an absolute /static/... path:
{{< rad file="/static/samples/demo/app.bicep" embed=true >}}
Add a source link just above the code block so readers can open the upstream file. The param shortcode resolves version to the samples branch that matches the current docs version:
<div class="td-max-width-on-larger-screens" style="margin-bottom: -2rem;"><a href="https://github.com/radius-project/samples/blob/{{< param version >}}/samples/demo/app.bicep" target="_blank" rel="noopener">samples/demo/app.bicep</a></div>
Show the deploy command with the rad-deploy shortcode. It renders rad deploy <url> against the correct docs host (edge.docs.radapp.io on edge, docs.radapp.io on release branches):
{{< rad-deploy path="samples/demo/app.bicep" >}}
Images
The markdown spec used by Docsy and Hugo does not give an option to resize images using markdown notation. Instead, raw HTML is used.
Begin by placing images under /docs/static/images with the naming convention of [page-name]-[image-name].[png|jpg|svg].
Then link to the image using:
{{< image src="/images/[image-filename]" width=1000 alt="Description of image" >}}
Don’t forget to set the alt attribute to keep the docs readable for our visually impaired users.
Example
This HTML will display the radius-overview.png image on the overview.md page:
{{< image src="radius-overview.png" width=1000 alt="Overview diagram of Radius and its core concepts" >}}
Alerts
The alert shortcode creates an alert block that can be used to display notices or warnings.
{{% alert title="Warning" color="warning" %}}
This is a warning.
{{% /alert %}}
Renders to:
This is a warning.
| Parameter | Default | Description |
|---|---|---|
| color | primary | One of the theme colors, eg primary, info, warning etc. |
Page info banner
The pageinfo shortcode creates a text box that you can use to add banner information for a page: for example, letting users know that the page contains placeholder content, that the content is deprecated, or that it documents a beta feature.
{{% pageinfo color="primary" %}}
This is placeholder content.
{{% /pageinfo %}}
Renders to:
This is placeholder content
| Parameter | Default | Description |
|---|---|---|
| color | primary | One of the theme colors, eg primary, info, warning etc. |
Tabbed content
Tabs are made possible through Hugo shortcodes.
The overall format is:
{{< tabs [Tab1] [Tab2]>}}

{{% codetab %}}
[Content for Tab1]
{{% /codetab %}}

{{% codetab %}}
[Content for Tab2]
{{% /codetab %}}

{{< /tabs >}}
All content you author will be rendered to Markdown, so you can include images, code blocks, YouTube videos, and more.
Example
{{< tabs Windows Linux MacOS>}}

{{% codetab %}}
```powershell
iwr -useb "https://raw.githubusercontent.com/radius-project/radius/main/deploy/install.ps1" | iex
```
{{% /codetab %}}

{{% codetab %}}
```bash
wget -q "https://raw.githubusercontent.com/radius-project/radius/main/deploy/install.sh" -O - | /bin/bash
```
{{% /codetab %}}

{{% codetab %}}
```bash
curl -fsSL "https://raw.githubusercontent.com/radius-project/radius/main/deploy/install.sh" | /bin/bash
```
{{% /codetab %}}

{{< /tabs >}}
This example will render to this:
iwr -useb "https://raw.githubusercontent.com/radius-project/radius/main/deploy/install.ps1" | iex
wget -q "https://raw.githubusercontent.com/radius-project/radius/main/deploy/install.sh" -O - | /bin/bash
curl -fsSL "https://raw.githubusercontent.com/radius-project/radius/main/deploy/install.sh" | /bin/bash
YouTube videos
Hugo can automatically embed YouTube videos using a shortcode:
{{< youtube [VIDEO ID] >}}
Example
Given the video https://youtu.be/dQw4w9WgXcQ
The shortcode would be:
{{< youtube dQw4w9WgXcQ >}}
Buttons
To create a button in a webpage, use the button shortcode.
An optional newtab parameter will indicate if the page should open in a new tab. Options are “true” or “false”. Default is “false”, where the page will open in the same tab.
Link to an external page
{{< button text="My Button" link="https://example.com" >}}
Link to another docs page
You can also reference pages in your button as well:
{{< button text="My Button" page="contributing" newtab="true" >}}
Link to a GitHub file/directory
You can link to a GitHub repo and path with the githubRepo and githubPath parameters:
{{< button text="My Button" githubRepo="samples" githubPath="samples" >}}
Button colors
You can customize the colors using the Bootstrap colors:
{{< button text="My Button" link="https://example.com" color="primary" >}}
{{< button text="My Button" link="https://example.com" color="secondary" >}}
{{< button text="My Button" link="https://example.com" color="success" >}}
Inline buttons
By default, buttons are padded with new lines below the button. To remove these new lines to create multiple buttons in-line, add a newline="false" parameter:
{{< button text="Previous" link="https://example.com" newline="false" >}}
{{< button text="Next" link="https://example.com" >}}
Maintaining the docs
This section covers routine Radius docs maintainer and approver responsibilities. To perform these tasks, you need either approver or maintainer status in the radius-project/docs repo.
Branch guidance
The Radius docs handles branching differently than most code repositories. Instead of a main branch, every branch is labeled to match the major and minor version of a runtime release, plus an edge branch for in-flight work. For example, the v1.0 branch contains the docs for the v1.0 release. The edge branch contains the latest in-flight work.
Managing content between branches
As a docs approver or maintainer, you need to perform routine upmerges to keep the pre-release edge branch aligned with updates to the current release branch. It is recommended to upmerge the current branch into the pre-release branch on a weekly basis.
- Open the Upmerge to edge workflow.
- Select Run workflow, choose the current release branch (for example,
v1.0), and run it. The selected source commit is pinned for the run; the workflow does not change the source branch. - Follow the ready-for-review
upmerge/pull request linked by the Create pull request step. If merging produces no net changes, including when the source is already an ancestor ofedge, no PR is created. Genuine content conflicts instead stop the run and list the affected files; no provisional source snapshot or draft PR is created. - Review the diff, including the Docsy module version in
docs/go.modand its checksum entries indocs/go.sum. If versions differ, keep theedgeDocsy version and corresponding checksum entries unless the PR includes an intentional, reviewed Docsy version change. Retain unrelated module changes rather than restoring either file wholesale. The workflow preserves theedgeversions ofdocs/config.tomlanddocs/layouts/partials/hooks/body-end.html, including files deleted onedge. - If the workflow reports content conflicts, resolve them on the source or
edgebranch through normal review, preserving changes from both branches. A rerun retains the original source SHA and reads currentedge; start a new workflow run if the source commit must change. Keep resolution commits signed and DCO-signed-off. An older draft produced before this policy contains a provisional source snapshot, not a resolved merge; restore any omitted edge-only content before marking it ready. - Obtain the normal reviews and required checks, then squash-merge the PR. The workflow never bypasses branch rules or merges automatically.
The local .github/workflows/upmerge.yaml is a synced caller for the shared upmerge workflow. Docs and samples use that same implementation at main; only repository-specific settings, such as the docs files preserved from edge, belong in the caller.
For the shared workflow’s merge and signing behavior, see Signed Release Upmerge.
Change upmerge rules and action versions in radius-project/.github, not in copies here. Update the native preserve-paths workflow input in workflow-templates/upmerge-docs.yml when docs-specific preserved paths change. The .github/sync.yml configuration maps the static docs and samples callers to their edge branches; use the signed release upmerge sync process to propagate them. Sync copies only the thin callers, not the shared implementation. File synchronization is appropriate for the caller; the actual upmerge still needs a three-way merge to preserve edge-only content.
The RADIUS_RELEASE_BOT App installation on radius-project/docs must grant Contents: Read & Write, Pull requests: Read & Write, and Workflows: Read & Write. The workflow requests only those write permissions for this repository. The workflow permission is needed to carry changes to .github/workflows/; an installation administrator must grant it if missing. Do not work around a missing grant by dropping workflow changes, weakening branch rules, or adding a private commit-signing key.
Merge the shared workflow into radius-project/.github@main before merging or dispatching its callers. For this rollout, the docs caller must also reach v0.61, the current default branch and executing upmerge source; syncing only edge does not bootstrap current release-branch executions. After the shared implementation and release-branch caller are available, a new signed upmerge can carry the caller to edge before the next release branch is cut. Future shared implementation fixes are maintained centrally rather than copied into each repository. No default-branch or final-release behavior changes are needed.
New runs resolve the shared workflow at the current main revision. For runs using the reusable workflow, rerunning failed jobs or a specific job keeps the original shared-workflow commit, while rerunning all jobs resolves main again. Rerunning an older, pre-migration inline workflow cannot adopt the changed caller; start a new run after rollout.
Validate caller changes with the existing workflow configuration lint and documentation checks, and compare .github/workflows/upmerge.yaml with its native source in radius-project/.github. Check the explicit secret mappings and the two preserved docs paths. Do not dispatch a live upmerge just to validate caller wiring.
Keep the sample application in sync
The Getting Started tutorial embeds the Radius Demo application (app.bicep and app-redis.bicep) directly from the radius-project/samples repository so the docs never drift from the real, tested sample. The files are vendored into this repo under docs/static/samples/demo/. Because Hugo serves static/ from the site root, each file is also published at a stable URL, for example https://docs.radapp.io/samples/demo/app.bicep.
How the sync works
- Source of truth:
samples/demo/*.bicepinradius-project/samples, on the branch that matches this docs branch (edgeonedge,vX.Yon release branches). - Vendored copy:
docs/static/samples/demo/*.bicep, committed to this repo and embedded by the tutorial pages with theradshortcode. - Download script:
.github/scripts/download-sample-app.shreads theversionparam fromdocs/config.toml, downloads every*.bicepfromsamples/demo/at that ref (falling back to the default branch if the ref is missing), and writes them intodocs/static/samples/demo/. A new*.bicepadded upstream is picked up automatically. - Drift check:
.github/workflows/sync-sample-app.yamlruns the script on every pull request and fails if the committed copy is out of date with upstream. It is a no-op until the files are first vendored.
Refresh the vendored files
When the sample changes upstream, run the script from the repo root and commit the result:
bash ./.github/scripts/download-sample-app.sh
git add docs/static/samples/demo
git commit -s -m "Sync sample app from radius-project/samples"
Set GITHUB_TOKEN first if you hit the GitHub API rate limit. When cutting a release branch, run the script once so the new vX.Y branch vendors the matching vX.Y sample.
References
Feedback
Was this page helpful?
Glad to hear it! Please feel free to star our repo and join our Discord server to stay up to date with the project.
Sorry to hear that. If you would like to also contribute a suggestion visit and tell us how we can improve.