How-To: Contribute to the Radius documentation
The Radius docs are built on Hugo with the Docsy theme. GitHub Actions are used to build and deploy the docs upon each PR.
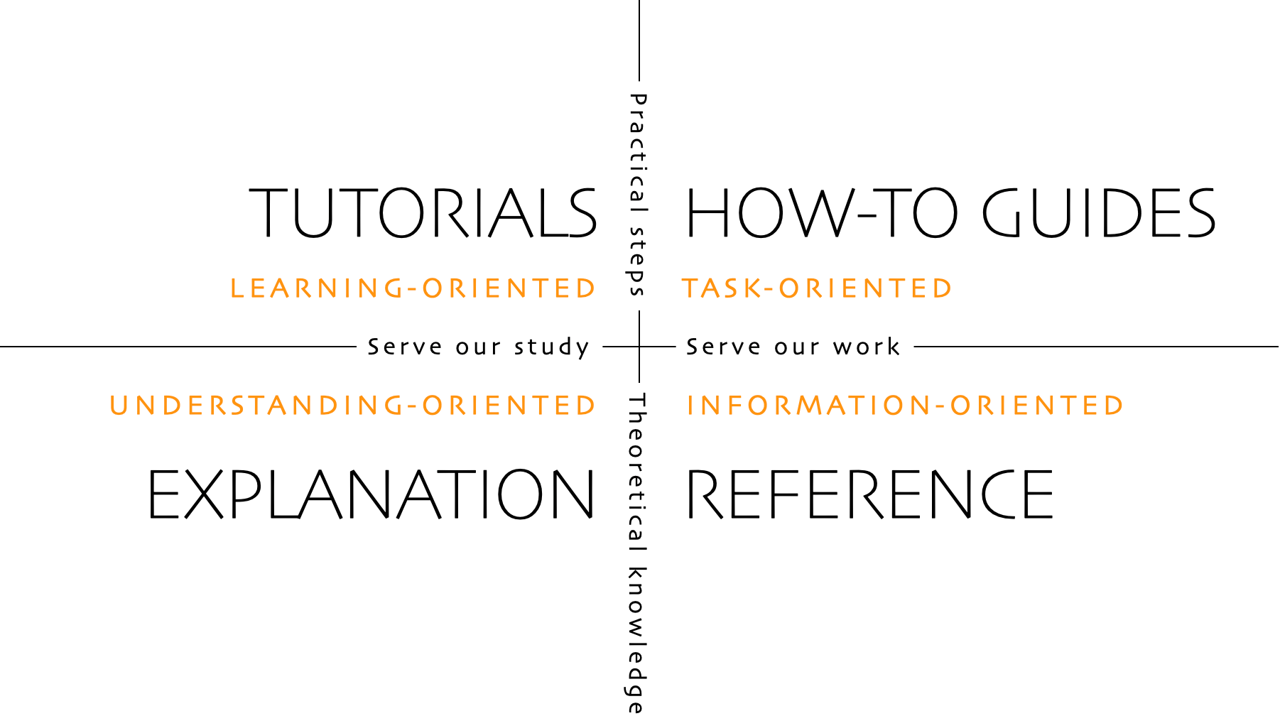
Radius uses the Diátaxis framework for its documentation:
Follow the guidance on this page to learn how to get started, how to contribute, and how to use the Diátaxis framework to create new docs.
Setup your docs environment
GitHub Codespace (easiest)
It’s easy to get up and running with a GitHub Codespace. This will give you a fully configured environment with all the tools you need to build the docs, all in your browser.
Create codespaceNote the
postCreateCommandmay take up to 3 minutes to complete after the codespace is created to complete.
- Start Codespace
- Wait for
postCreateCommandto complete - Run
cd docsto enter the hugo site directory - Run
hugo serverto start the local server - Click on the link in the terminal to open the docs in your browser
Local machine
Pre-requisites
Environment setup
Ensure pre-requisites are installed
Clone this repository and the radius repository
git clone https://github.com/radius-project/radius.git
git clone https://github.com/radius-project/docs.git
Generate CLI docs:
pushd radius
go run ./cmd/docgen/main.go ../docs/docs/content/reference/cli
popd
Update submodules:
cd docs
git submodule update --init --recursive
Install npm packages:
npm installInitialize the docsy theme:
cd themes/docsy
npm install
cd ..
Run local server
Make sure you’re still in the
docsdirectoryRun
hugo serverNavigate to
http://localhost:1313/
Developer Certificate of Origin
The Radius project follows the Developer Certificate of Origin. This is a lightweight way for contributors to certify that they wrote or otherwise have the right to submit the code they are contributing to the project.
Contributors sign-off that they adhere to these requirements by adding a Signed-off-by line to commit messages.
This is my commit message

Signed-off-by: Random J Developer <random@developer.example.org>
Git even has a -s command line option to append this automatically to your commit message:
git commit -s -m 'This is my commit message'
Visual Studio Code has a setting, git.alwaysSignOff to automatically add a Signed-off-by line to commit messages. Search for “sign-off” in VS Code settings to find it and enable it.
Types of docs
There are 5 types of docs in Radius:
- Concept - A concept doc is a high-level overview of the project or an area of the project.
- Overview - A overview page documents a specific feature or capability of the project, with information on what the feature is and additional context and links on how to use it.
- How-To - A how-to guide is a step-by-step guide to help the reader achieve a specific task. It assumes the reader has a basic understanding of the project and its concepts. For more information on how-to guides, see Diátaxis.
- Reference - A reference doc is a detailed description of a specific feature or capability of the project. It assumes the reader has a basic understanding of the project and its concepts. For more information on reference docs, see Diátaxis.
Overall:
- Avoid creating new sections where possible, there is a good chance a proper place in the docs hierarchy already exists.
- Make sure to include a complete Hugo front-matter.
- Determine the type of doc you are contributing
Concept docs
Visit Diátaxis for more information on explanatory documentation that helps the user understand the project or a specific area of the project.
- Ensure the reader can understand why they should care about the project or the concept. What problems does it help them solve?
- Provide a link to the overview page of the feature that justifies the concept(s)
- Provide the reader with related links if needed (this can be other concepts, overviews, how-to guides, or references)
- Set the
categoryasConceptin Hugo front-matter.
Overview docs
Visit Diátaxis for more information on explanatory documentation that helps the user understand the project or a specific area of the project.
- Ensure the reader can understand why they should care about the feature and what it enables them to do.
- If applicable, ensure the doc references the reference spec document.
- If applicable, ensure the doc is consistent with any related concepts or specs in terms of names, parameters, and terminology. Update both the concept, spec, and the doc as needed. Avoid repeating the spec. The idea is to give the reader more information and background on the capability so that they can try this out.
- Provide the reader with related links if needed (this can be other concepts, overviews, how-to guides, or references)
- Set the
categoryasOverviewin Hugo front-matter.
How-To guides
Visit Diátaxis for more information on how-to documentation that helps the user accomplish a specific task.
- Do not assume the reader is using a specific environment unless the article itself is specific to an environment. This includes OS (Windows/Linux/MacOS), deployment target (Kubernetes, IoT, etc.), or programming language. If instructions vary between operating systems, provide guidance for all.
- Include code/sample/config snippets that can be easily copied and pasted.
- Provide the reader with related links if needed (this can be other concepts, overviews, how-to guides, or references)
- Set the
categoryasHow Toin Hugo front-matter.
Reference docs
Visit Diátaxis for more information on reference documentation that helps the user understand the details of a specific feature or capability of the project.
Reference docs should be auto-generated from source-code whenever possible. Please contact the maintainers if you need to add a new reference doc, or open an Issue to discuss.
Writing styles and tips
Style and tone
These conventions should be followed throughout all Radius documentation to ensure a consistent experience across all docs.
| Style/Tone | Guidance |
|---|---|
| Casing | Use upper case only:
|
| Headers and titles | Headers and titles must be descriptive and clear, use sentence casing i.e. use the above casing guidance for headers and titles too |
| Use simple sentences | Easy-to-read sentences mean the reader can quickly use the guidance you share. |
| Avoid the first person | Use second person “you”, “your” instead of “I”, “we”, “our”. |
| Assume a new developer audience | Some obvious steps can seem hard. E.g. Now set an environment variable Radius to a value X. It is better to give the reader the explicit command to do this, rather than having them figure this out. |
| Use present tense | Avoid sentences like “this command will install redis”, which implies the action is in the future. Instead, use “This command installs redis” which is in the present tense. |
Spelling
The docs pipeline uses cspell to check for spelling mistakes. The configuration lives in .github/configs/.cspell.yml and is kept in sync with the radius-project/radius repository so spell-checking behaves the same across Radius repos. If you need to add a new custom word to the allow-list, append it to .cspellignore at the repository root (keep the list sorted, one word per line).
To run the spell checker locally:
npm install -g cspell
cspell lint --config ./.github/configs/.cspell.yml --no-progress --dot "**/*.md"
Numbering
All numbered lists use 1. as the number, regardless of the order. The list numbers are then incremented automatically during the build process of the docs.
Example
1. This is the first step of a process.
1. This is the second step, and will be displayed with a 2 in the docs.
1. This is the third step, and will be displayed with a 3.
Tips and tricks
Any contribution must ensure not to break the website build. The way Hugo builds the website requires following the below guidance.
Front-matter
Front-matter is what takes regular markdown files and upgrades them into Hugo-compatible docs for rendering into the nav bars and ToCs.
Every page needs a section at the top of the document like this:
---
type: docs
title: "TITLE FOR THE PAGE"
linkTitle: "SHORT TITLE FOR THE NAV BAR"
weight: (number)
description: "1+ SENTENCES DESCRIBING THE ARTICLE"
categories: "TYPE OF THE DOCUMENT"
tags: "METADATA ON THE DOCUMENT"
---
Example
---
type: docs
title: "Service invocation overview"
linkTitle: "Overview"
weight: 10
description: "A quick overview of Dapr service invocation and how to use it to invoke services within your application"
categories: "Concept"
tags: "Dapr"
---
Weight determines the order of the pages in the left sidebar, with 0 being the top-most.
- Index file weights follow the parent directory’s ordering.
- For the first page in a new directory, reset the counter and set the weight to be an order of magnitude greater.
Front-matter should be completed with all fields including type, title, linkTitle, weight, description, categories and tags.
titleshould be 1 sentence, with no period at the endlinkTitleshould be 1-3 words, with the exception of How-to at the front.descriptionshould be 1-2 sentences on what the reader will learn, accomplish, or do in this doc.categoriesshould be one of the following:- Concept
- Overview
- Tutorial
- How-To
- Reference
- Schema
tagsshould be a comma-separated list of metadata tags.
As per the styling conventions, titles should only capitalize the first word and proper nouns, with the exception of “How-To:” - “Getting started with Dapr service invocation” - “How-To: Setup a local Redis instance”
Referencing other pages
Hugo ref and relref shortcodes are used to reference other pages and sections. It also allows the build to break if a page is incorrectly renamed or removed.
This shortcode, written inline with the rest of the markdown page, will link to the _index.md of the section/folder name:
{{< ref "folder" >}}
This shortcode will link to a specific page:
{{< ref "page.md" >}}
Note that all pages and folders need to have globally unique names in order for the ref shortcode to work properly. If there are duplicate names the build will break and an error will be thrown.
Referencing sections in other pages
To reference a specific section on another page, add #section-short-name to the end of your reference.
As a general rule, the section’s short name is the text of the section title, all lowercase, with spaces changed to “-”. You can check the section’s short name by visiting the website page, clicking the link icon (🔗) next to the section, and see how the URL renders in the nav bar. The content after the “#” is your section shortname.
As an example, for this specific section, the complete reference to the page and section would be:
{{< ref "contributing-docs.md#referencing-sections-in-other-pages" >}}
Code snippets
Use the rad shortcode to reference code snippets from a file. By convention place code snippets in a snippets folder.
{{< rad file="snippets/mysample.bicep" embed=true >}}
All Bicep sample code should be self-contained in separate files, not in markdown. We validate all .bicep files as part of the build for syntactic and semantic correctness, and so all .bicep sample code must be complete and correct. Use the techniques described here to highlight the parts of the sample code users should focus on.
Use the embed parameter (default false) to include a download link and embed the content in the page.
Use the lang (default bicep) parameter to configure the language used for syntax highlighting.
Use the marker parameter to limit the embedded snipped to a portion of the sample file. This is useful when you want to show just a portion of a larger file. The typical way to do this is surround the interesting code with comments, and then pass the comment text into marker.
The shortcode below and code sample:
{{< rad file="snippets/mysample.bicep" embed=true marker="//SAMPLE" >}}
// in snippets/mysample.bicep
resource app 'radius.dev/Application@v1alpha3' = {
  name: 'storefront-app'

  //SAMPLE
  resource store 'Container' = {
    name: 'storefront'
    properties: {
      container: {
        image: 'foo'
      }
    }
  }
  //SAMPLE
}
Will result in the following output:
  resource store 'Container' = {
    name: 'storefront'
    properties: {
      container: {
        image: 'foo'
      }
    }
  }
Use the replace-key-[token] and replace-value-[token] parameters to limit the embedded snipped to a portion of the sample file. This is useful when you want abbreviate a portion of the code sample. Multiple replacements are supported with multiple values of token.
The shortcode below and code sample:
{{< rad file="snippets/mysample.bicep" embed=true marker="//SAMPLE" replace-key-container="//RUN" replace-value-container="container: {...}" replace-key-connections="//CONNECTIONS" replace-value-connections="connections: {...}" >}}
// in snippets/mysample.bicep
resource app 'radius.dev/Application@v1alpha1' = {
  name: 'storefront-app'

  //SAMPLE
  resource store 'Container' = {
    name: 'storefront'
    properties: {
      //RUN
      container: {
        image: 'foo'
      }
      //RUN
      //BINDINGS
      connections: {
        backend: {
          source: other.id
        }
      }
      //BINDINGS
    }
  }
  //SAMPLE
}
Will result in the following output:
  resource store 'Container' = {
    name: 'storefront'
    properties: {
      container: {...}
      connections: {...}
    }
  }
Images
The markdown spec used by Docsy and Hugo does not give an option to resize images using markdown notation. Instead, raw HTML is used.
Begin by placing images under /daprdocs/static/images with the naming convention of [page-name]-[image-name].[png|jpg|svg].
Then link to the image using:
{{< image src="/images/[image-filename]" width=1000 alt="Description of image" >}}
Don’t forget to set the alt attribute to keep the docs readable for our visually impaired users.
Example
This HTML will display the radius-overview.png image on the overview.md page:
{{< image src="radius-overview.png" width=1000 alt="Overview diagram of Dapr and its building blocks" >}}
Alerts
The alert shortcode creates an alert block that can be used to display notices or warnings.
{{% alert title="Warning" color="warning" %}}
This is a warning.
{{% /alert %}}
Renders to:
This is a warning.
| Parameter | Default | Description |
|---|---|---|
| color | primary | One of the theme colors, eg primary, info, warning etc. |
Page info banner
The pageinfo shortcode creates a text box that you can use to add banner information for a page: for example, letting users know that the page contains placeholder content, that the content is deprecated, or that it documents a beta feature.
{{% pageinfo color="primary" %}}
This is placeholder content.
{{% /pageinfo %}}
Renders to:
This is placeholder content
| Parameter | Default | Description |
|---|---|---|
| color | primary | One of the theme colors, eg primary, info, warning etc. |
Tabbed content
Tabs are made possible through Hugo shortcodes.
The overall format is:
{{< tabs [Tab1] [Tab2]>}}

{{% codetab %}}
[Content for Tab1]
{{% /codetab %}}

{{% codetab %}}
[Content for Tab2]
{{% /codetab %}}

{{< /tabs >}}
All content you author will be rendered to Markdown, so you can include images, code blocks, YouTube videos, and more.
Example
{{< tabs Windows Linux MacOS>}}

{{% codetab %}}
```powershell
powershell -Command "iwr -useb https://raw.githubusercontent.com/dapr/cli/master/install/install.ps1 | iex"
```
{{% /codetab %}}

{{% codetab %}}
```bash
wget -q https://raw.githubusercontent.com/dapr/cli/master/install/install.sh -O - | /bin/bash
```
{{% /codetab %}}

{{% codetab %}}
```bash
brew install dapr/tap/dapr-cli
```
{{% /codetab %}}

{{< /tabs >}}
This example will render to this:
powershell -Command "iwr -useb https://raw.githubusercontent.com/dapr/cli/master/install/install.ps1 | iex"
wget -q https://raw.githubusercontent.com/dapr/cli/master/install/install.sh -O - | /bin/bash
brew install dapr/tap/dapr-cli
YouTube videos
Hugo can automatically embed YouTube videos using a shortcode:
{{< youtube [VIDEO ID] >}}
Example
Given the video https://youtu.be/dQw4w9WgXcQ
The shortcode would be:
{{< youtube dQw4w9WgXcQ >}}
Buttons
To create a button in a webpage, use the button shortcode.
An optional newtab parameter will indicate if the page should open in a new tab. Options are “true” or “false”. Default is “false”, where the page will open in the same tab.
Link to an external page
{{< button text="My Button" link="https://example.com" >}}
Link to another docs page
You can also reference pages in your button as well:
{{< button text="My Button" page="contributing" newtab="true" >}}
Link to a GitHub file/directory
You can link to a GitHub repo and path with the githubRepo and githubPath parameters:
{{< button text="My Button" githubRepo="samples" githubPath="samples" >}}
Button colors
You can customize the colors using the Bootstrap colors:
{{< button text="My Button" link="https://example.com" color="primary" >}}
{{< button text="My Button" link="https://example.com" color="secondary" >}}
{{< button text="My Button" link="https://example.com" color="success" >}}
{{< button text="My Button" link="https://example.com" color="danger" >}}
{{< button text="My Button" link="https://example.com" color="warning" >}}
{{< button text="My Button" link="https://example.com" color="info" >}}
My Button
My Button
My Button
My Button
My Button
My Button
Inline buttons
By default, buttons are padded with new lines below the button. To remove these new lines to create multiple buttons in-line, add a newline="false" parameter:
{{< button text="Previous" link="https://example.com" newline="false" >}}
{{< button text="Next" link="https://example.com" >}}
Categorize content
You can use the categorizeby shortcode to pull and organize content by either categories and tags. This is useful when you want to categorize content by tags and the type of the document
{{ categorizeby category="How-To" tag= "containers" }}
This categorizes and lists all the docs that has both “How-To” as the category and “container” as the tag.
{{ categorizeby category="How-To" }}
This categorizes and lists all the docs that are How-To by the available tags.
References
Feedback
Was this page helpful?
Glad to hear it! Please feel free to star our repo and join our Discord server to stay up to date with the project.
Sorry to hear that. If you would like to also contribute a suggestion visit and tell us how we can improve.