Tutorial: Use Helm to run your first app
Categories:
This tutorial will teach you the following about Radius:
- How to use update a Helm chart to include its resources in a Radius application
- How to use features like Recipes and Connections within Kubernetes YAML or Helm
Prerequisites
Step 1. Clone and open the sample code
It’s easy and free to get up and running with a Radius Codespace in GitHub. Spin up a Radius environment in seconds with the following link:
![]()
Once launched you should already have the application cloned locally. Use the terminal to navigate to the ./demo/ directory:
cd ./samples/demo
Use the terminal to clone the samples repository locally and navigate to the ./samples/demo directory:
git clone https://github.com/radius-project/samples.git
cd ./samples/samples/demo
Step 2. Initialize Radius
Initialize Radius. For this example, answer NO when asked whether to set up an application:
Select ‘No’ when prompted to create an application.
rad init
Step 3. Understand and deploy the application
-
Navigate to the
./Chartfolder and browse its contents. This contains a Helm chart for the application that you will modify.Here are the contents of
./demo/Chart/templates/app.yaml. This file is part of the Helm chart, and describes the container used for this tutorial:apiVersion: apps/v1 kind: Deployment metadata: name: webapp namespace: {{ .Release.Namespace }} spec: selector: matchLabels: app: webapp template: metadata: labels: app: webapp spec: containers: - name: webapp image: {{ .Values.image.repository }}:{{ .Values.image.tag }} env: - name: CONNECTION_REDIS_URL valueFrom: secretKeyRef: name: redis-secret key: url ports: - containerPort: 3000The container that you will be working with is a ToDo application that uses Redis as a database.
- The container is configured to listen on port 3000.
- The container will use the environment variable
CONNECTION_REDIS_URLto connect to Redis. - This
CONNECTION_REDIS_URLenvironment variable is populated by a Kubernetes Secret.
You can deploy this application for the first time by following these steps:
- Create the Kubernetes namespace
demo - Create the Kubernetes Secret
redis-secretcontaining the Redis URL. - Install the Helm chart.
💡 Redis
For now you’re not going to actually deploy Redis and the URL in this step is fake. You will deploy Redis using a Recipe later in the tutorial that will replace the fake URL contained withinredis-secretwith an actual container and URL. -
Complete these steps by running the following commands:
kubectl create namespace demo
kubectl create secret generic --namespace demo --from-literal=url=redis://fake-server redis-secret
helm upgrade demo ./Chart -n demo --install
The output should look similar to the following:
> kubectl create namespace demo
namespace/demo created

> kubectl create secret generic --namespace demo --from-literal=url=redis://fake-server redis-secret
secret/redis-secret created

> helm upgrade demo ./Chart -n demo --install
Release "demo" does not exist. Installing it now.
NAME: demo
LAST DEPLOYED: Wed Sep 13 01:05:19 2023
NAMESPACE: demo
STATUS: deployed
REVISION: 1
TEST SUITE: None
⚠️ Chart Directory
If you see an error message like Error: path “./Chart” not found then you are in the wrong directory. Make sure your terminal is in the./demodirectory of thesamplesrepository. -
Run the following command to check if everything is running:
kubectl get all -n demoThe output should look similar to the following:
> kubectl get all -n demo
NAME                          READY   STATUS    RESTARTS   AGE
pod/webapp-79d5dfb99-vhj9g    1/1     Running   0          2m48s

NAME                      READY   UP-TO-DATE   AVAILABLE   AGE
deployment.apps/webapp    1/1     1            1           2m49s

NAME                                DESIRED   CURRENT   READY   AGE
replicaset.apps/webapp-79d5dfb99    1         1         1       2m49s
The generated names and ages of the objects will be different in your output. Make sure you see the status of
Runningfor thepod/webapp-...entry. If the status is notRunning, try repeating thekubectl get all -n demoafter waiting.At this point you’ve deployed the application but you have not actually used Radius yet. You will start doing that in the next step, as well as set up and use Redis.
The steps so far are similar to how many applications are managed today:
- Dependencies like Redis are provisioned manually and separately from application deployment.
- Connection information like passwords and addresses is manually stored in secret stores.
- Applications access the connection information from those secret stores when they are deployed.
Over the next few steps you will update this application to use Radius so that:
- ✅ Dependencies like Redis are provisioned on-demand when they are needed.
- ✅ Connection information is managed automatically, secret stores are an implementation detail.
- ✅ Applications have a documented relationship with the dependencies they connect to.
From here you will go through a series of steps to incrementally add more Radius features to the application.
Step 4. Add Radius
-
Make sure the
app.yamlfile from./demo/Chart/templates/app.yamlis open in your editor. You will make some edits to this file to enable Radius.Add the
annotationsproperty tometadata, and then add theradapp.io/enabled: 'true'annotation. The'true'must be surrounded in quotes.The example below shows the updated
metadatasection after making the changes.apiVersion: apps/v1 kind: Deployment metadata: name: webapp namespace: {{ .Release.Namespace }} # Add the following two lines annotations: radapp.io/enabled: 'true' radapp.io/environment: '{{ .Values.environment }}' spec: ...Adding the
radapp.io/enabled: 'true'annotation enables Radius for the deployment. Theradapp.io/environmentannotation is optional and is used to set the environment for the application. If not specified, Radius will use the default environment. -
Save the file after you have made the edits and deploy the application again using Helm. Since the namespace and secret have already been created, we only need to run the
helmcommand.helm upgrade demo ./Chart -n demo --installThe output should look like:
> helm upgrade demo ./Chart -n demo --install
Release "demo" has been upgraded. Happy Helming!
NAME: demo
LAST DEPLOYED: Wed Sep 13 01:31:58 2023
NAMESPACE: demo
STATUS: deployed
REVISION: 2
TEST SUITE: None
You should confirm that your output contains
REVISION: 2, that means that the changes were applied. -
Run the following command to confirm that everything is running:
kubectl get all -n demoThe output should look similar to the following:
> kubectl get all -n demo
NAME                          READY   STATUS    RESTARTS   AGE
pod/webapp-79d5dfb99-mv6q9    1/1     Running   0         10m

NAME                      READY   UP-TO-DATE   AVAILABLE   AGE
deployment.apps/webapp    1/1     1            1           10m

NAME                                DESIRED   CURRENT   READY   AGE
replicaset.apps/webapp-79d5dfb99    1         1         1       10m
Notice that the
AGEofpod/webapp-...reflects the time of your first deployment. Enabling Radius for an application does not change any of its behaviors, so Kubernetes did not need to restart the container. -
Now that Radius has been enabled, run this command to display the state of the Radius application:
rad app graph -a demo -g default-demowhere
-a demospecifies the application name and-g default-demospecifies the resource group name. Resource groups are a way to organize resources in Radius.The output should look like this:
> rad app graph -a demo -g default-demo
Displaying application: demo

Name: webapp (Applications.Core/containers)
Connections: (none)
Resources:
  webapp (kubernetes: apps/Deployment)
This means that Radius has found the Kubernetes
Deploymentrunning your container and cataloged it as part of the application.💡 Application Name
Radius will use the Kubernetes namespace as the application name by default.
Step 5. Add Recipe
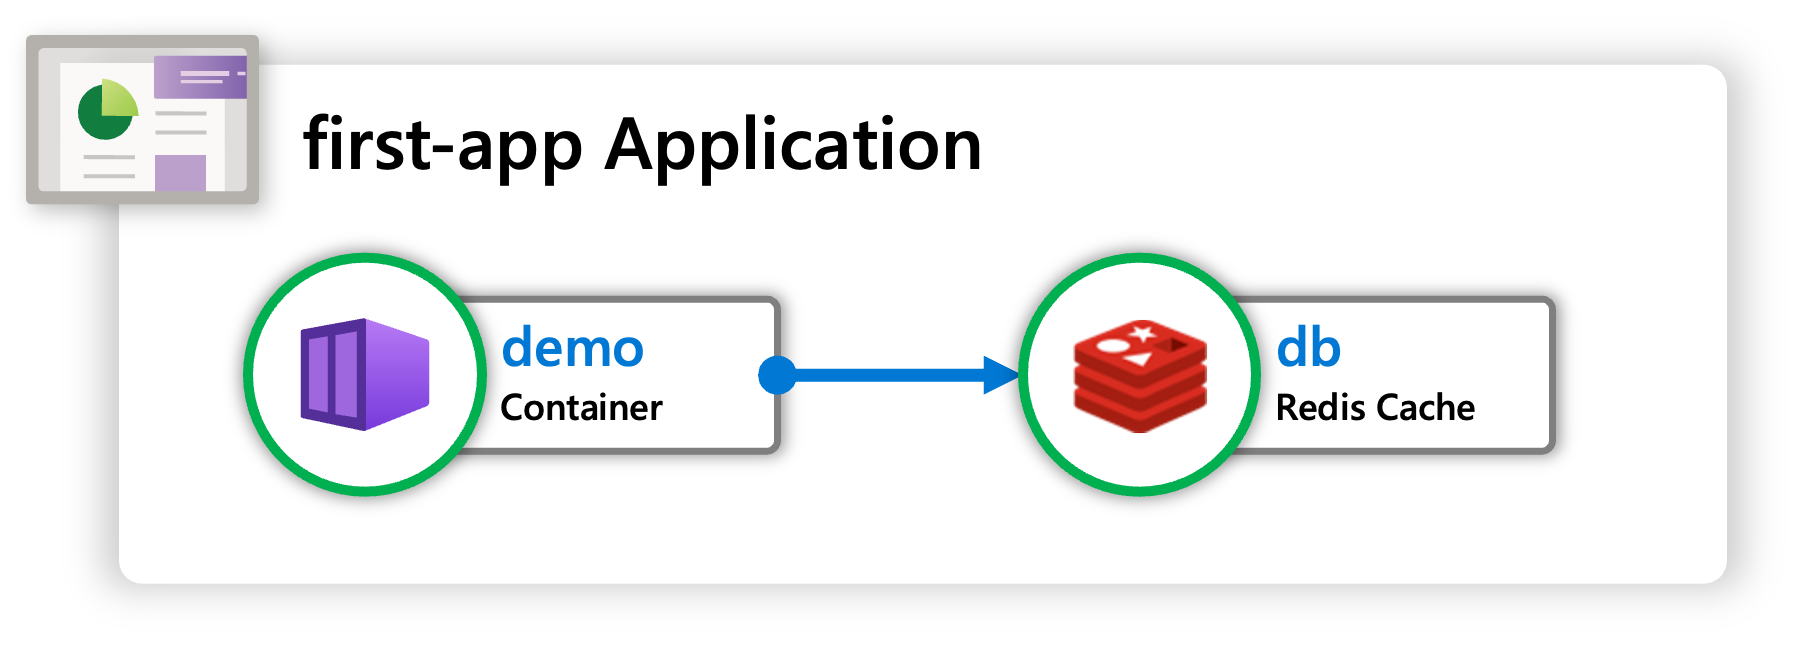
This step will add a database (Redis Cache) to the application.
You can create a Redis Cache using Recipes provided by Radius. The Radius community provides Recipes for running commonly used application dependencies, including Redis.
In this step you will:
- Add Redis to the application using a Recipe.
- Update the Kubernetes secret with the connection information from Redis.
-
First, check recipes installed in your environment by running:
rad recipe listYou will see output like this:
NAME      TYPE                                    TEMPLATE KIND  TEMPLATE VERSION  TEMPLATE
default   Applications.Datastores/sqlDatabases    bicep                            radius.ghcr.io/recipes/local-dev/sqldatabases:latest
default   Applications.Messaging/rabbitMQQueues   bicep                            radius.ghcr.io/recipes/local-dev/rabbitmqqueues:latest
default   Applications.Dapr/pubSubBrokers         bicep                            radius.ghcr.io/recipes/local-dev/pubsubbrokers:latest
default   Applications.Dapr/secretStores          bicep                            radius.ghcr.io/recipes/local-dev/secretstores:latest
default   Applications.Dapr/stateStores           bicep                            radius.ghcr.io/recipes/local-dev/statestores:latest
default   Applications.Datastores/mongoDatabases  bicep                            radius.ghcr.io/recipes/local-dev/mongodatabases:latest
default   Applications.Datastores/redisCaches     bicep                            radius.ghcr.io/recipes/local-dev/rediscaches:latest
The recipe for
Applications.Datastores/redisCachesis what you will use in this example.💡 Recipes
Radius includes Recipes for local development when you use `rad init`. These [**local-dev**](https://github.com/radius-project/recipes/tree/main/local-dev) Recipes run popular OSS technologies as containerized infrastructure without requiring a cloud account. In a production environment you can substitute recipes that will create cloud or on-premises dependencies instead. -
Make sure the
app.yamlfile from./demo/Chart/templates/app.yamlis open in your editor. At the bottom of the file add the following text, including the---:--- apiVersion: radapp.io/v1alpha3 kind: Recipe metadata: name: db namespace: {{ .Release.Namespace }} spec: environment: '{{ .Values.environment }}' type: Applications.Datastores/redisCaches secretName: redis-secretDefining a
Recipeobject in Kubernetes will use a Radius Recipe to create dependencies for your application:- The
.spec.typefield defines the type of resource to create.Applications.Datastores/redisCachesis the type for a Redis Cache. - The
.spec.secretNamefield tells Radius where to store connection information. This is optional, and should be used to interoperate with other Kubernetes technologies that read from secrets. This tutorial example uses the secret to populate an environment variable.
- The
-
Save the file after you have made the edits and deploy the application again using Helm. Since the namespace and secret have already been created, you only need to run the
helmcommand.helm upgrade demo ./Chart -n demo --installThe output should look like:
> helm upgrade demo ./Chart -n demo --install
Release "demo" has been upgraded. Happy Helming!
NAME: demo
LAST DEPLOYED: Wed Sep 13 01:44:04 2023
NAMESPACE: demo
STATUS: deployed
REVISION: 3
TEST SUITE: None
This time you should see
REVISION: 3. -
Now that you are using a Recipe, you should see more resources running in Kubernetes. Run the following command:
kubectl get all -n demoThe output should look similar to the following:
> kubectl get all -n demo

pod/redis-r5tcrra3d7uh6-7bcd8b8d8d-jmgn4     2/2     Running   0          51s
pod/webapp-79d5dfb99-f6xgj                   1/1     Running   0          52s

NAME                          TYPE        CLUSTER-IP     EXTERNAL-IP   PORT(S)    AGE
service/redis-r5tcrra3d7uh6   ClusterIP   10.43.104.63   <none>        6379/TCP   51s

NAME                                  READY   UP-TO-DATE   AVAILABLE   AGE
deployment.apps/redis-r5tcrra3d7uh6   1/1     1            1           51s
deployment.apps/webapp                1/1     1            1           52s

NAME                                             DESIRED   CURRENT   READY   AGE
replicaset.apps/redis-r5tcrra3d7uh6-7bcd8b8d8d   1         1         1       51s
replicaset.apps/webapp-79d5dfb99                 1         1         1       52s

NAME                  TYPE                                  SECRET         STATUS
recipe.radapp.io/db   Applications.Datastores/redisCaches   redis-secret   Ready
Look at the status of the
recipe.radapp.io/dbresource. If the status is notReady, then try running the command again after a delay. The status should show asReadywhen the Recipe has fully-deployed. You can also see additional resources starting withredis-. These were created by the Recipe.⚠️ Missing resources
If you do not see the additional resources starting withredis-then it’s likely they are in a different Kubernetes namespace. Runkubectl get all -Ato see everything. -
Now that you have added a Recipe, run this command to display the state of the Radius application:
rad app graph -a demo -g default-demoThe output should look like this:
> rad app graph -a demo -g default-demo
Displaying application: demo

Name: webapp (Applications.Core/containers)
Connections: (none)
Resources:
  webapp (kubernetes: apps/Deployment)

Name: db (Applications.Datastores/redisCaches)
Connections: (none)
Resources:
  redis-r5tcrra3d7uh6 (kubernetes: apps/Deployment)
  redis-r5tcrra3d7uh6 (kubernetes: core/Service)
rad app graphshows the Application Graph of the application. This includes:- Entries for each major resource:
webappis anApplications.Core/containersanddbis anApplications.Datastores/redisCaches. - Connections between resources: (none yet, you will add this next).
- Resources that were created: see the Kubernetes
Deploymentlisted forwebappand the KubernetesDeploymentandServicelisted fordb.
The Redis Cache created by the recipe is visible as part of the application. You can also see the
Resourcescreated in Kubernetes that make up the Redis Cache. In a previous step you saw these listed bykubectl. Since Radius deployed the Recipe, it knows that these resources logically are part of the Redis Cache in the application. - Entries for each major resource:
-
You can also see the contents of
redis-secretas created by Radius. Run the following command:kubectl get secret -n demo redis-secret -o yamlThe output should look like the following:
>kubectl get secret -n demo redis-secret -o yaml
apiVersion: v1
data:
  connectionString: cmVkaXMtcjV0Y3JyYTNkN3VoNi5kZW1vLnN2Yy5jbHVzdGVyLmxvY2FsOjYzNzksYWJvcnRDb25uZWN0PUZhbHNl
  host: cmVkaXMtcjV0Y3JyYTNkN3VoNi5kZW1vLnN2Yy5jbHVzdGVyLmxvY2Fs
  password: ""
  port: NjM3OQ==
  tls: ZmFsc2U=
  url: cmVkaXM6Ly9yZWRpcy1yNXRjcnJhM2Q3dWg2LmRlbW8uc3ZjLmNsdXN0ZXIubG9jYWw6NjM3OS8wPw==
  username: ""
kind: Secret
metadata:
  creationTimestamp: "2023-09-13T01:49:36Z"
  name: redis-secret
  namespace: demo
  ownerReferences:
  - apiVersion: radapp.io/v1alpha3
    blockOwnerDeletion: true
    controller: true
    kind: Recipe
    name: db
    uid: d40567a1-cd52-4984-8321-6cb8bea5f798
  resourceVersion: "3672"
  uid: b1613fb0-09e6-4f76-8685-02f458e173b9
type: Opaque
The actual values like
connectionStringare Base64 encoded in this display. Theurlvalue in this secret is being used by the container to connect to the Redis Cache. For each type of Recipe, Radius stores the most-commonly used connection information for the convenience of application developers.
Step 6. Add Connection
At this point you have added Radius to your existing container and used a Recipe to create a Redis Cache. In this step, you will use Radius Connections to inject settings into the container instead of explicitly managing a secret.
Make sure the app.yaml file from ./demo/Chart/templates/app.yaml is open in your editor.
-
First, add another annotation. This time add the
radapp.io/connection-redis: 'db'annotation, to.metadata.annotations. Order does not matter but indentation does.Here’s the updated content of
metadata:apiVersion: apps/v1 kind: Deployment metadata: name: webapp namespace: {{ .Release.Namespace }} annotations: radapp.io/enabled: 'true' radapp.io/environment: '{{ .Values.environment }}' radapp.io/connection-redis: 'db' spec: ...The
radapp.io/connection-annotation defines a connection from the container to some other dependency. Each connection has:- A name:
redisis the connection name this case. - A source:
dbis the name of the Recipe you created earlier.
Connections are named because you can define many of them. The connection name is used to generate environment variables that are unique to the connection.
Since you’re using a connection called
redis, Radius will automatically define theCONNECTION_REDIS_URLenvironment variable. The prefix ofCONNECTION_REDIS_will be combined with each of the settings that you could see in theredis-secretsecret in the previous step. - A name:
-
You can remove the manual definition of
CONNECTION_REDIS_URLfromapp.yamlsince Radius will provide it automatically. Find theenvproperty and delete all of its contents. You can also remove.spec.secretNamefrom theRecipe.The final contents of
app.yamlshould look like:apiVersion: apps/v1 kind: Deployment metadata: name: webapp namespace: {{ .Release.Namespace }} annotations: radapp.io/enabled: 'true' radapp.io/environment: '{{ .Values.environment }}' radapp.io/connection-redis: 'db' spec: selector: matchLabels: app: webapp template: metadata: labels: app: webapp spec: containers: - name: webapp image: {{ .Values.image.repository }}:{{ .Values.image.tag }} ports: - containerPort: 3000 --- apiVersion: radapp.io/v1alpha3 kind: Recipe metadata: name: db namespace: {{ .Release.Namespace }} spec: environment: '{{ .Values.environment }}' type: Applications.Datastores/redisCaches -
Save the file after you have made the edits and deploy the application again using Helm.
helm upgrade demo ./Chart -n demo --installThe output should look like:
> helm upgrade demo ./Chart -n demo --install
Release "demo" has been upgraded. Happy Helming!
NAME: demo
LAST DEPLOYED: Wed Sep 13 02:09:41 2023
NAMESPACE: demo
STATUS: deployed
REVISION: 4
TEST SUITE: None
This time you should see
REVISION: 4.Check the status in Kubernetes again by running:
kubectl get all -n demoThe output should look like:
> kubectl get all -n demo
NAME                                       READY   STATUS    RESTARTS   AGE
pod/redis-r5tcrra3d7uh6-7bcd8b8d8d-jmgn4   2/2     Running   0          20m
pod/webapp-76db7964d8-plc2s                1/1     Running   0          37s

NAME                          TYPE        CLUSTER-IP     EXTERNAL-IP   PORT(S)    AGE
service/redis-r5tcrra3d7uh6   ClusterIP   10.43.104.63   <none>        6379/TCP   20m

NAME                                  READY   UP-TO-DATE   AVAILABLE   AGE
deployment.apps/redis-r5tcrra3d7uh6   1/1     1            1           20m
deployment.apps/webapp                1/1     1            1           20m

NAME                                             DESIRED   CURRENT   READY   AGE
replicaset.apps/redis-r5tcrra3d7uh6-7bcd8b8d8d   1         1         1       20m
replicaset.apps/webapp-79d5dfb99                 0         0         0       20m
replicaset.apps/webapp-76db7964d8                1         1         1       37s
replicaset.apps/webapp-687dcf5cdf                0         0         0       38s

NAME                  TYPE                                  SECRET   STATUS
recipe.radapp.io/db   Applications.Datastores/redisCaches            Ready
Depending on the timing you may see pods in the
Terminatingstate. This is normal as old replicas take some time to shut down. -
Check the Radius status again. Now Radius is aware of the connection from
webapp->db:rad app graph -a demo -g default-demoThe output should look like the example below:
> rad app graph -a demo -g default-demo
Displaying application: demo

Name: webapp (Applications.Core/containers)
Connections:
  webapp -> db (Applications.Datastores/redisCaches)
Resources:
  webapp (kubernetes: apps/Deployment)

Name: db (Applications.Datastores/redisCaches)
Connections:
  webapp (Applications.Core/containers) -> db
Resources:
  redis-r5tcrra3d7uh6 (kubernetes: apps/Deployment)
  redis-r5tcrra3d7uh6 (kubernetes: core/Service)
Step 7. Try it out
In this step you can access the application and explore its features. Since the container is running inside Kubernetes, you need to run a port-forward to use it locally.
-
Run the following command to start the port-forward:
kubectl port-forward -n demo deployment/webapp 3000If you are inside Codespaces this will open a new browser tab that you can use to access the webapp.
If you are not using Codespaces then open your browser and navigate to
http://localhost:3000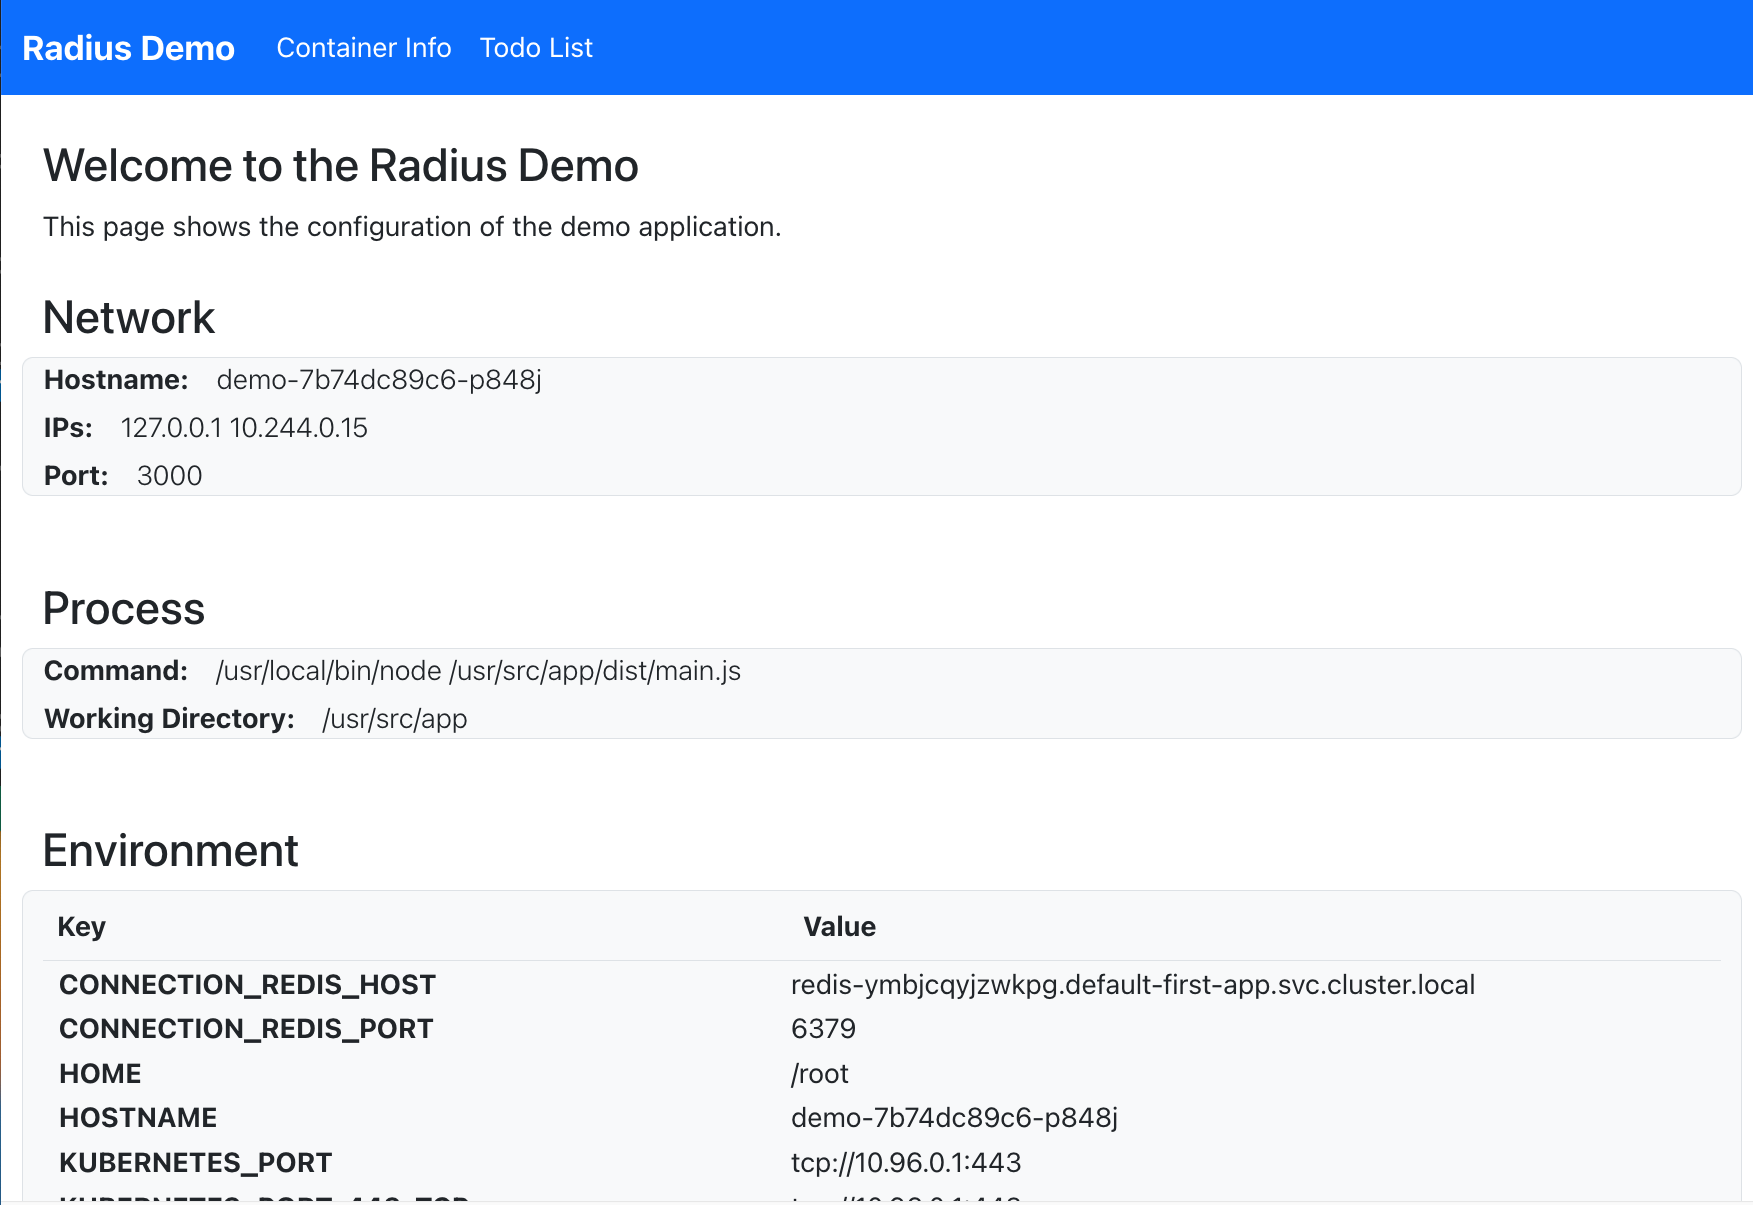
Congrats! You’re running your first Radius app.
You can use the homepage to view information about the container and its settings.
-
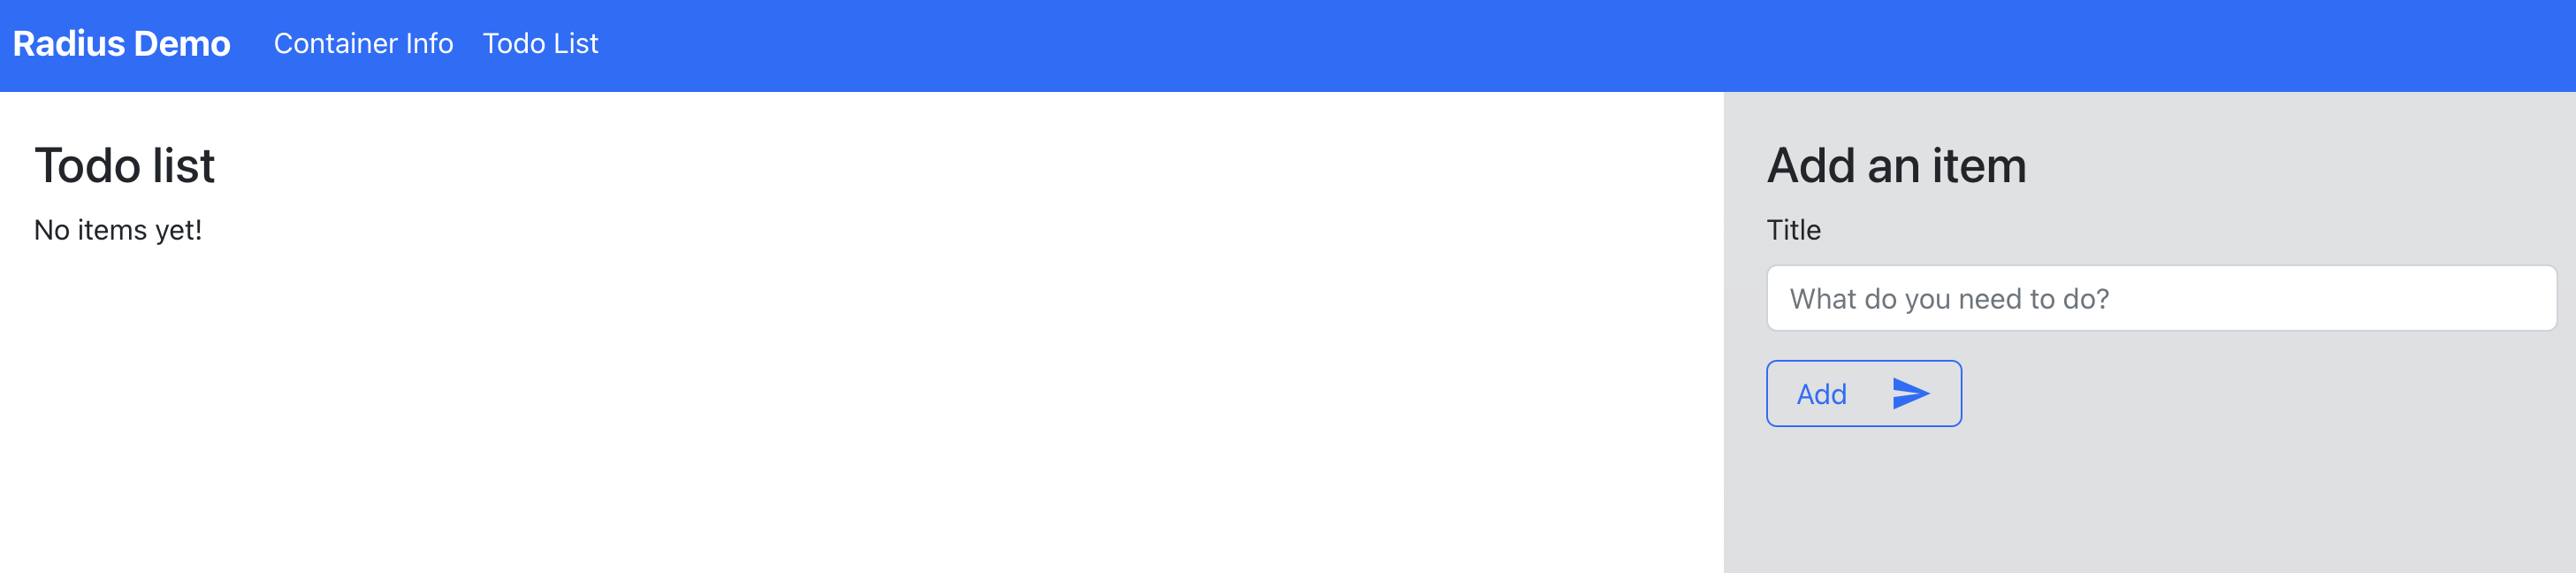
Navigate to the ToDo List tab and test out the application. Using the ToDo page will update the saved state in Redis.
When you’re ready to move on to the next step, use
CTRL+Cto exit the command.
Cleanup and next steps
To delete your app, run the following command:
This command also cleans up all the resources created by the Radius Recipe you deployed earlier.
helm uninstall demo -n demo
In summary, this tutorial walked through a hands-on example to show you how-to:
- Enable Radius for a Helm or Kubernetes-based application to catalog your assets.
- Use Recipes to create dependencies either for development or production use.
- Use Connections to automate the management of connection information.
Next step: Try another tutorial
Feedback
Was this page helpful?
Glad to hear it! Please feel free to star our repo and join our Discord server to stay up to date with the project.
Sorry to hear that. If you would like to also contribute a suggestion visit and tell us how we can improve.