Tutorial: Add Radius to an existing application
Categories:
This tutorial will teach you about adding Radius to an existing application using the built-in Kubernetes integration functionality. You will learn how to:
- Deploy an existing Kubernetes application
- Run and test the application
- Add Radius to the deployed application
- Confirm that Radius was added and can detect the application
By the end of this tutorial, you will have deployed an existing Kubernetes application and then updated it to add Radius functionality without changing the application or its original Kubernetes configurations.
Prerequisites
Overview
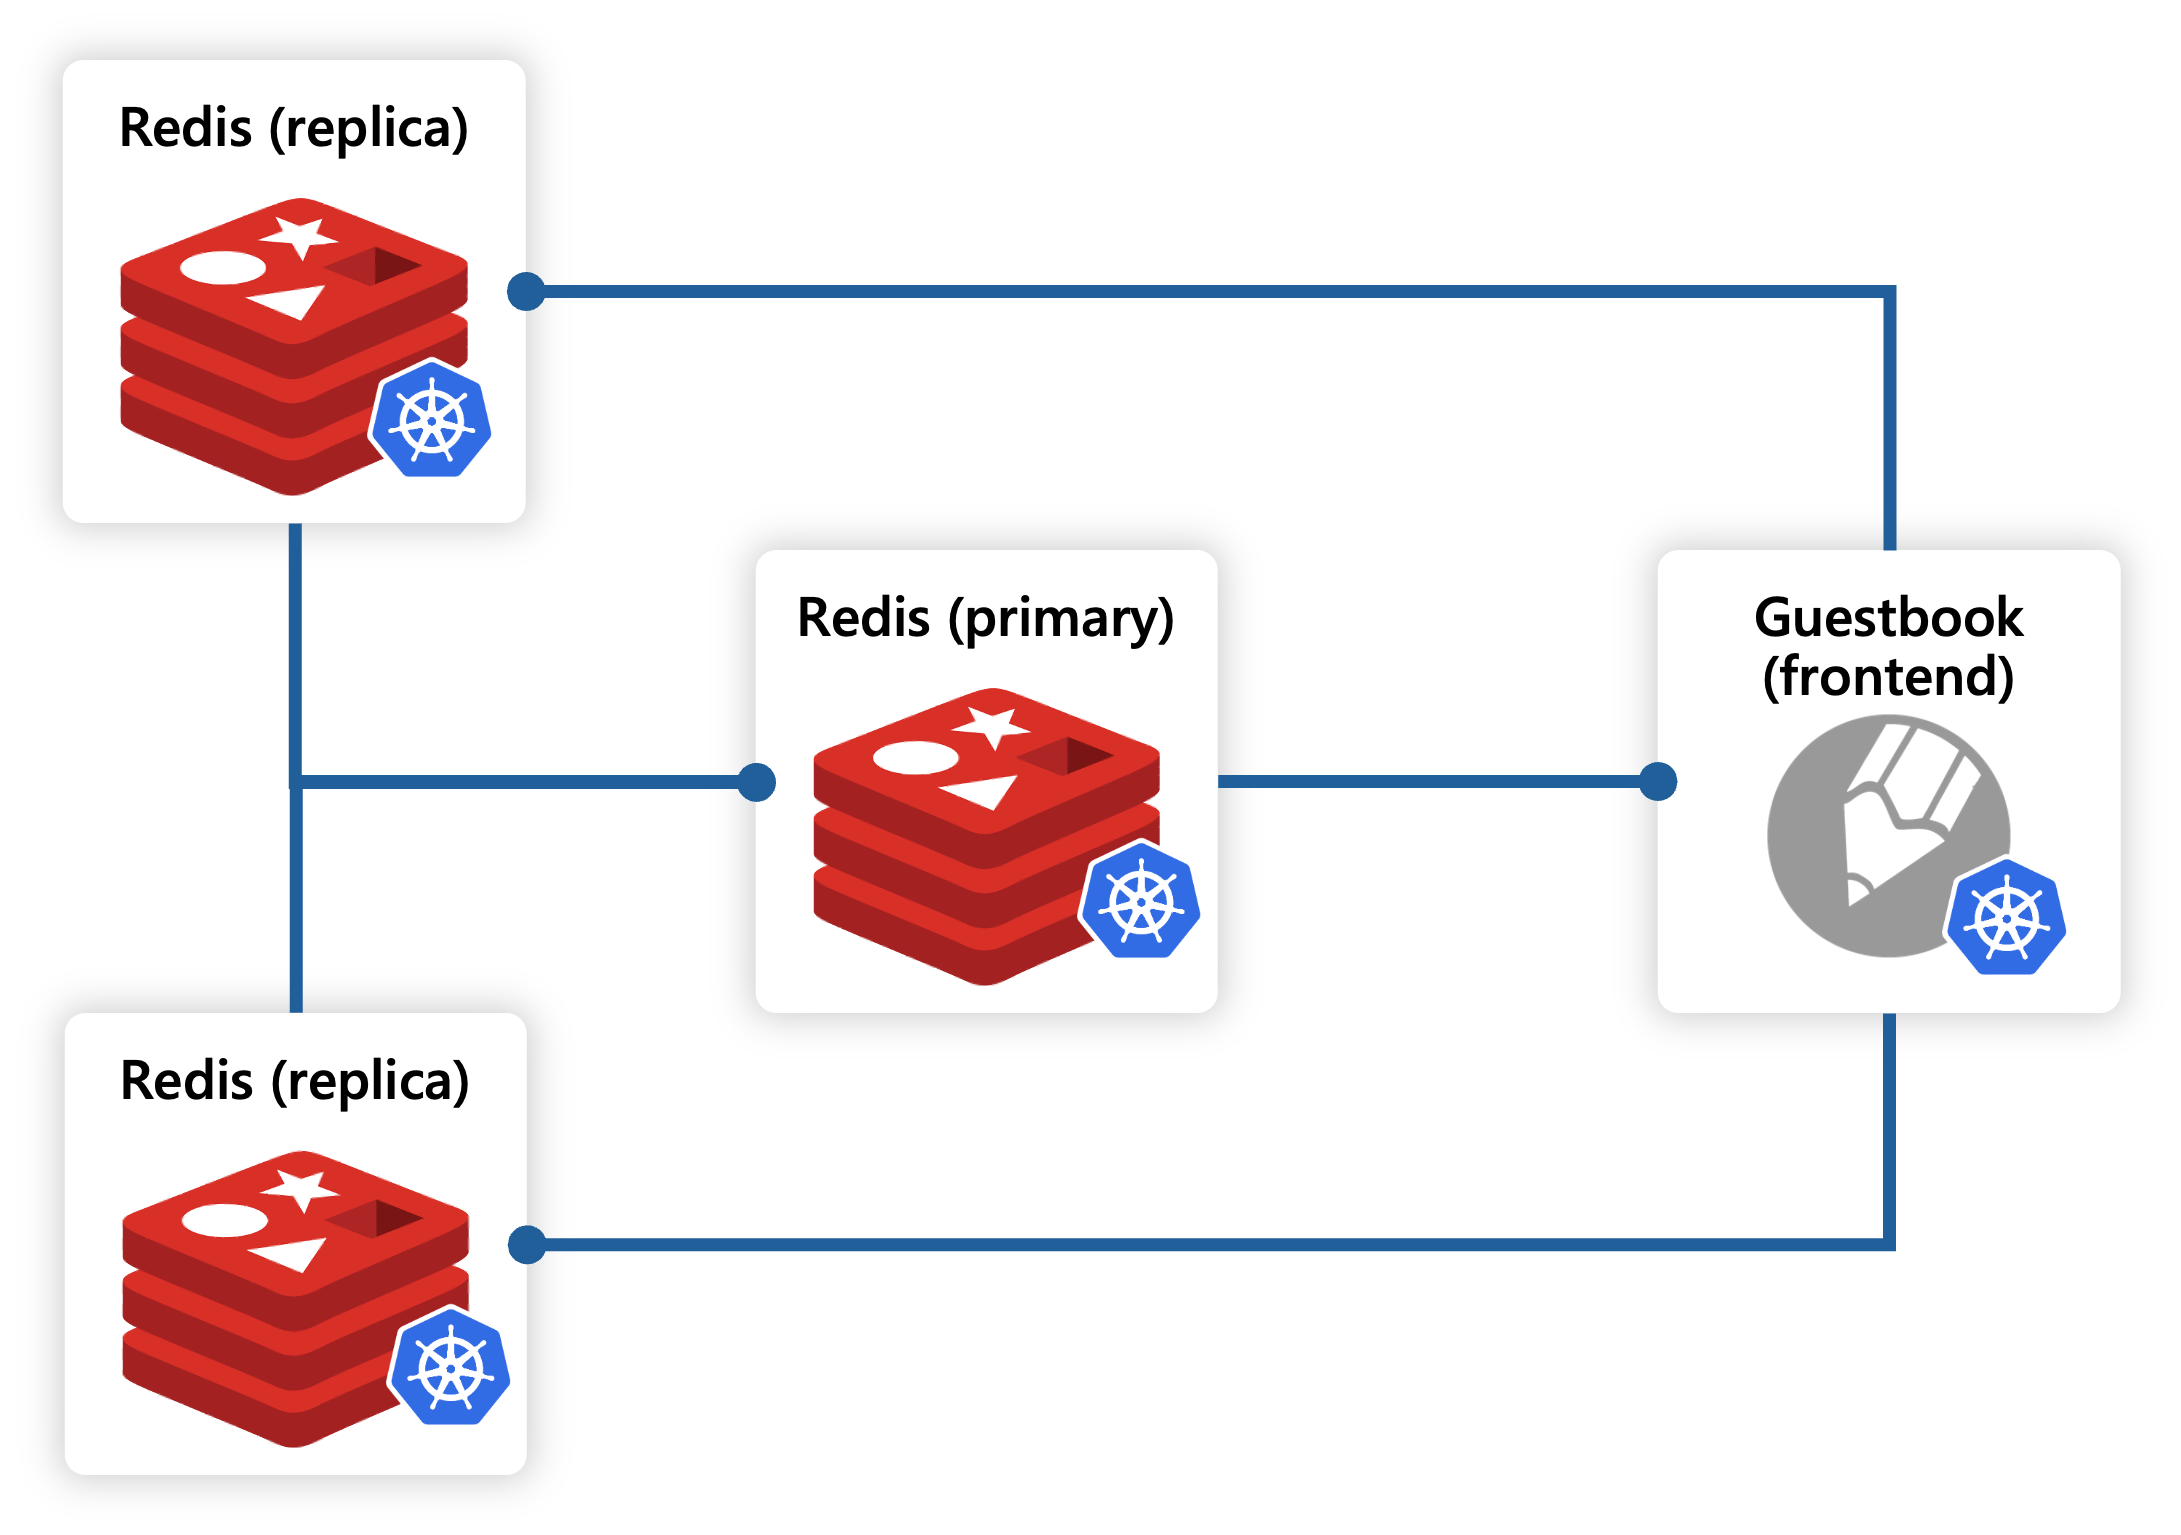
As a part of this tutorial you will deploy an existing containerized Guestbook application originally authored by the Kubernetes community for use in their own tutorials. You will then add Radius to the deployed application. To incrementally add Radius to an existing application, you will leverage the built-in Kubernetes integration functionality by adding an annotation to the application’s Kubernetes deployment manifest. This approach is particularly useful for adding Radius capabilities to applications that are already deployed.
The Guestbook application consists of a web front end along with primary and secondary Redis containers for storage, all deployed with Kubernetes. For more information about the application and access its source code, see the Kubernetes tutorial and their examples repo.
Step 1: Set up your environment
-
Clone the Radius samples repo to your local machine:
git clone https://github.com/radius-project/samples.git -
Navigate to the
samples/kubernetes/guestbookdirectory:cd samples/kubernetes/guestbookThe
kubernetes/guestbookdirectory contains the Kubernetes YAML manifest files for their Guestbook sample application, copied directly from the Kubernetes examples repo. -
Initialize Radius:
Run this command to initialize Radius. For this example, answer NO when asked whether to set up an application:
rad initYou should see output similar to:
Initializing Radius...
✅ Install Radius v0.48
   - Kubernetes cluster: k3d-k3s-default
   - Kubernetes namespace: radius-system
✅ Create new environment default
   - Kubernetes namespace: default
   - Recipe pack: local-dev
✅ Update local configuration
Initialization complete! Have a RAD time 😎
Step 2: Deploy and test the existing Guestbook application using kubectl
-
Create a Kubernetes namespace called
demo:kubectl create namespace demo -
Create and deploy the Guestbook application to the
demonamespace:kubectl apply -n demo -f ./deploy -
Verify that the application successfully deployed:
kubectl get all -n demoYou should see output similar to below, with 5 pods and 3 services successfully deployed as expected:
NAME READY STATUS RESTARTS AGE pod/redis-replica-787cd488b4-n7b4p 1/1 Running 0 10s pod/redis-replica-787cd488b4-vf6fh 1/1 Running 0 10s pod/frontend-77dfc58d7c-8zht6 1/1 Running 0 10s pod/redis-master-7597b47b98-ddgq9 1/1 Running 0 10s pod/frontend-77dfc58d7c-2gs2p 1/1 Running 0 10s pod/frontend-77dfc58d7c-2qd22 1/1 Running 0 10s NAME TYPE CLUSTER-IP EXTERNAL-IP PORT(S) AGE service/frontend NodePort 10.43.49.106 <none> 80:30972/TCP 10s service/redis-master ClusterIP 10.43.233.148 <none> 6379/TCP 10s service/redis-replica ClusterIP 10.43.118.183 <none> 6379/TCP 10s NAME READY UP-TO-DATE AVAILABLE AGE deployment.apps/redis-replica 2/2 2 2 10s deployment.apps/redis-master 1/1 1 1 10s deployment.apps/frontend 3/3 3 3 10s NAME DESIRED CURRENT READY AGE replicaset.apps/redis-replica-787cd488b4 2 2 2 10s replicaset.apps/redis-master-7597b47b98 1 1 1 10s replicaset.apps/frontend-77dfc58d7c 3 3 3 10s -
Validate that the application is running as expected:
Run this command to port forward the Guestbook application to port
8080on your local machine:kubectl port-forward -n demo svc/frontend 8080:80Open a browser and navigate to
http://localhost:8080. You should see the Guestbook application running: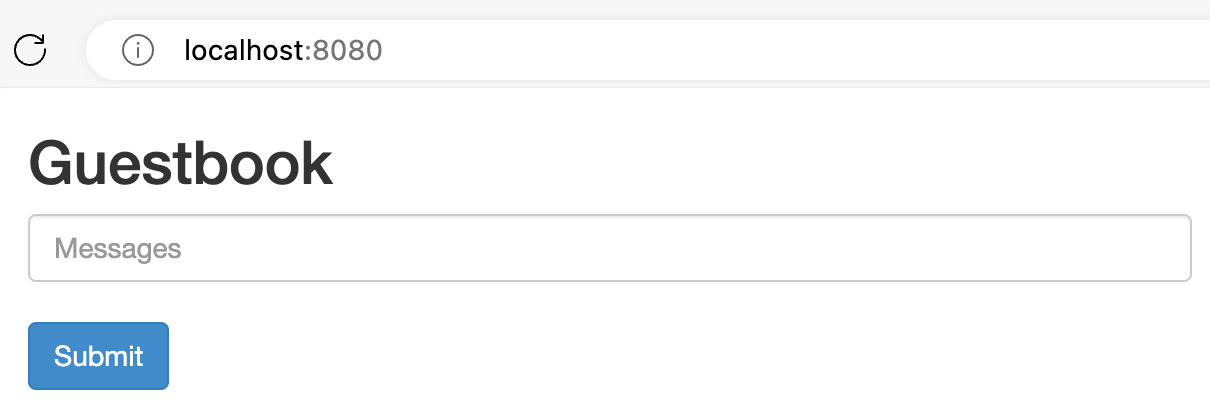
Terminate the port forwarding process by pressing
CTRL+Cin your terminal. -
Confirm that Radius has not yet been added:
Run this command to view the state of your application using Radius:
rad app graph -a demo -g default-demoSince you have not yet added Radius to the application, the
radCLI will not recognize yourdemoapplication and you should see a message in the output similar to:Displaying application: demo (empty)
Step 3: Add Radius to the Guestbook application
You will now add Radius to the Guestbook application’s Kubernetes deployment manifests by making edits to the YAML files in the deploy directory.
-
In each of the YAML files that contain a manifest for
Kind: Deployment, add theannotationsproperty tometadata, and then add theradapp.io/enabled: 'true'annotation. Note that the'true'must be surrounded in quotes.... metadata: ... annotations: radapp.io/enabled: 'true' ... spec: ...You should add the annotation to the following files:
deploy/frontend-deployment.yamldeploy/redis-master-deployment.yamldeploy/redis-replica-deployment.yaml
Note: Since Radius does not model Kubernetes Services, you do not need to add the annotation to the YAML files that contain a manifest for
Kind: Service(e.g.deploy/frontend-service.yaml).
As an example, yourdeploy/frontend-deployment.yamlfile should look like this:apiVersion: apps/v1 # for k8s versions before 1.9.0 use apps/v1beta2 and before 1.8.0 use extensions/v1beta1 kind: Deployment metadata: name: frontend annotations: radapp.io/enabled: 'true' spec: selector: matchLabels: app: guestbook tier: frontend replicas: 3 template: metadata: labels: app: guestbook tier: frontend spec: containers: - name: php-redis image: ghcr.io/radius-project/samples/gb-frontend:v4 resources: requests: cpu: 100m memory: 100Mi env: - name: GET_HOSTS_FROM value: dns # If your cluster config does not include a dns service, then to # instead access environment variables to find service host # info, comment out the 'value: dns' line above, and uncomment the # line below: # value: env ports: - containerPort: 80 -
Save your changes to the YAML files.
Step 4: Deploy and test the updated Guestbook application using kubectl
-
Run this command to deploy the updated Guestbook application to the
demonamespace:kubectl apply -n demo -f ./deploy -
Verify that the application successfully deployed:
kubectl get deployments -n demo
kubectl get services -n demo
You should see output similar to below, with the same 3 deployments and 3 services running as expected. Notice that the AGE of each resource reflects the time of your first deployment. Enabling Radius for an application does not change any of its behaviors, so Kubernetes did not need to restart the containers.
NAME READY UP-TO-DATE AVAILABLE AGE redis-master 1/1 1 1 10m redis-replica 2/2 2 2 10m frontend 3/3 3 3 10m NAME TYPE CLUSTER-IP EXTERNAL-IP PORT(S) AGE frontend NodePort 10.43.49.106 <none> 80:30972/TCP 10m redis-master ClusterIP 10.43.233.148 <none> 6379/TCP 10m redis-replica ClusterIP 10.43.118.183 <none> 6379/TCP 10m -
Validate that the application is running as expected:
Once again, run this command to port forward the Guestbook application to port
8080on your local machine:kubectl port-forward -n demo svc/frontend 8080:80Open a browser and navigate to
http://localhost:8080. You should see the Guestbook application running:
Terminate the port forwarding process by pressing
CTRL+Cin your terminal.
Step 5: Use Radius to display the state of your application
Now that Radius has been enabled for your application, run this command again:
rad app graph -a demo -g default-demo
You should see output containing information and status of your newly “radified” application, similar to:
Displaying application: demo

Name: frontend (Applications.Core/containers)
Connections: (none)
Resources:
  frontend (kubernetes: apps/Deployment)

Name: redis-master (Applications.Core/containers)
Connections: (none)
Resources:
  redis-master (kubernetes: apps/Deployment)

Name: redis-replica (Applications.Core/containers)
Connections: (none)
Resources:
  redis-replica (kubernetes: apps/Deployment)
This output shows that Radius has detected the three container resources in the Kubernetes application that you have just deployed. Note that since you have not used Radius to define any connections between the resources, the Connections field is empty. However, your application is now ready to be further modified using the Radius features that are now available to you, , such as Connections, Recipes, and more.
Step 6: Clean up
-
Run the following command to delete all Pods, Deployments, and Services in the
demonamespace:kubectl delete -n demo -f ./deployThe output should look similar to:
deployment.apps "frontend" deleted service "frontend" deleted deployment.apps "redis-master" deleted service "redis-master" deleted deployment.apps "redis-replica" deleted service "redis-replica" deleted -
Run the following command to delete the
demonamespace:kubectl delete namespace demoThe output should look similar to:
namespace "demo" deleted
Next steps
- To learn more about authoring Radius applications, visit the Authoring applications guide
- To learn more about deploying applications using Radius, visit the Deploying applications guide
- To learn more about using the Radius Connections annotations to connect your containers and resources, visit the Radius Helm tutorial
- To learn more about Radius Recipes, visit the Recipes guide
Feedback
Was this page helpful?
Glad to hear it! Please feel free to star our repo and join our Discord server to stay up to date with the project.
Sorry to hear that. If you would like to also contribute a suggestion visit and tell us how we can improve.